
Microsoft 365 is a powerful set of everyday tools that I use regularly for both personal tasks and work. Apps like Word, Excel, Outlook and OneNote are easy to start with, but there are plenty of small features that can save time when used consistently.
This guide focuses on practical Microsoft Office tips for beginners, the kind that improve your workflow without requiring advanced skills. If you’re getting started with Microsoft 365 or simply want to work more efficiently using the basics, these tips will help you build better habits and get more done with less effort.
1. Master Keyboard Shortcuts
While not exclusive to Microsoft 365 apps, mastering keyboard shortcuts can significantly boost your productivity by saving time on repetitive tasks. Common shortcuts:
| Shortcut Flow | Action | Why It’s Useful |
|---|---|---|
| Ctrl + C -> Ctrl + V | Copy and paste | Move text and data quickly without opening menus. |
| Ctrl + Z -> Ctrl + Y | Undo and redo | Fix mistakes fast and restore changes. |
| Ctrl + B / Ctrl + I / Ctrl + U | Text formatting | Apply bold, italic, or underline while typing. |
| Ctrl + A -> Ctrl + F | Select all, then find | Navigate large documents faster. |
| Ctrl + F -> Ctrl + H | Find and replace | Edit repeated text in seconds. |
| Ctrl + K | Insert hyperlink | Add links without using menus. |
| Ctrl + P | Open the print dialog instantly. | |
| Ctrl + S | Save | Prevent lost work by saving often. |
2. Explore OneDrive Integration
OneDrive is built directly into Microsoft 365 and quietly handles one of the most important tasks for beginners: saving and protecting your files automatically. Instead of keeping everything only on your computer, documents saved to OneDrive are backed up and accessible from anywhere.
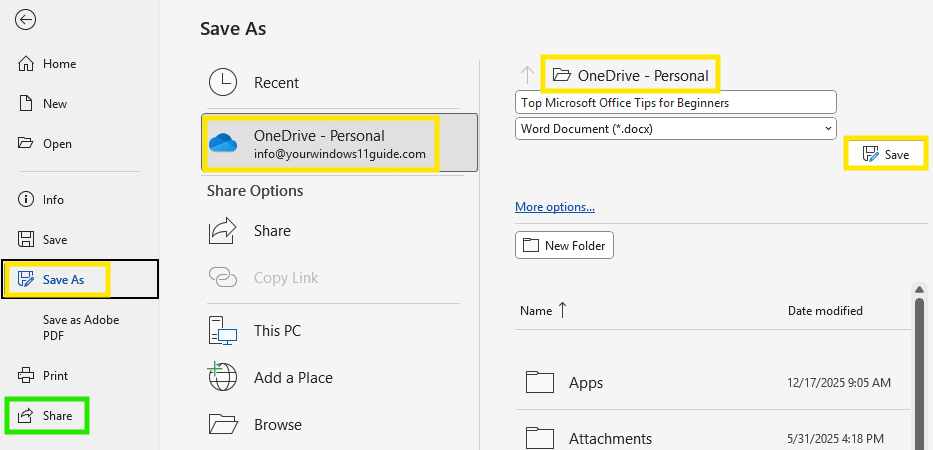
When working in Word, Excel or PowerPoint, you can save files to OneDrive by selecting File > Save As > OneDrive. From there, your work stays synced across devices, which is especially useful if you switch between a laptop, desktop, or mobile device. You can also share documents with others by clicking Share and generating a link, eliminating the need for email attachments and version control issues.
If you want a deeper look at how OneDrive works and how to use it properly, check out my detailed guide: Everything You Should Know About OneDrive. Keep in mind that OneDrive storage depends on your Microsoft 365 plan, so it’s worth reviewing current Microsoft Family and Personal subscriptions.
3. Use OneNote for Note-Taking and Organization
Microsoft OneNote is a flexible place to keep notes, ideas, and reference information in one organized space. Instead of working with multiple documents, OneNote lets you group everything into a single notebook, then break it down into sections and pages that are easy to navigate and update over time.
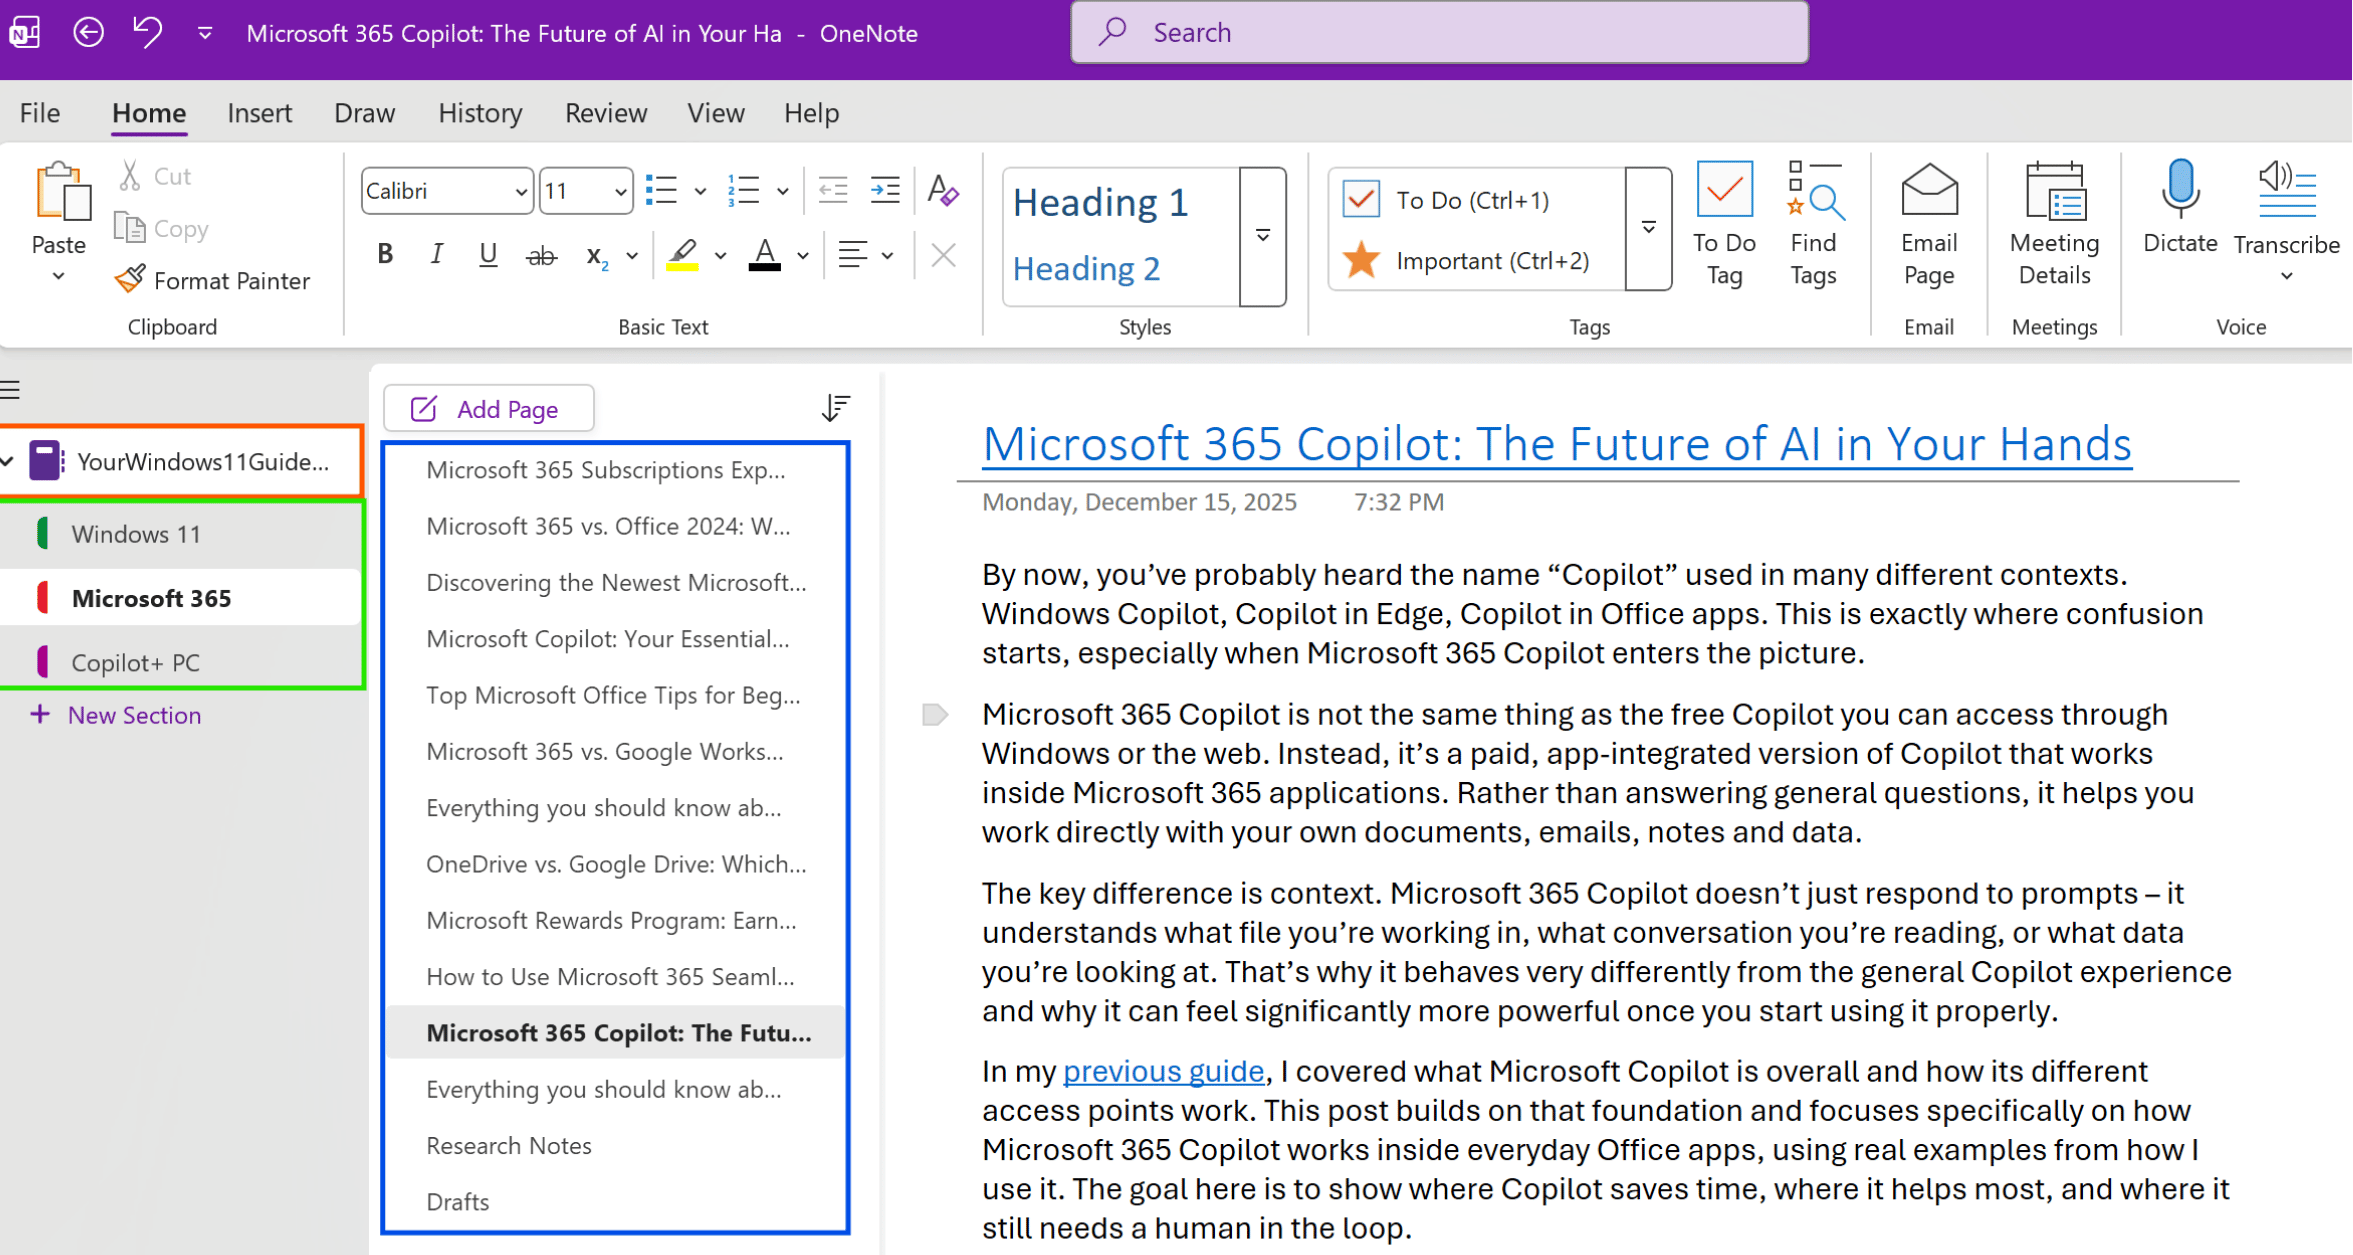
For example, when taking meeting notes or planning a project, you can create a notebook, add sections for different topics, and use individual pages for specific notes. This structure makes it easy to keep related information together without worrying about strict formatting.
OneNote also supports mixed content, so you can type freely, paste images or screenshots, and add links directly onto a page. Because everything syncs automatically, your notebook stays accessible across devices, making it practical for everyday use, not just formal note-taking. If you want a deeper look at how notebooks, sections, and pages work together, check out my detailed guide: Everything You Should Know About OneNote.
4. Use Dictation, Transcribe and Grammar Tools
Microsoft 365 includes built-in tools that help you create and refine text more efficiently, especially when you’re working on longer documents, emails, or notes.
Dictation lets you turn your voice into text by clicking the microphone icon in apps like Word, Outlook and OneNote. It’s useful for drafting ideas quickly or working hands-free when typing isn’t convenient.
Transcribe is helpful when you have recorded audio, such as meeting notes or voice memos, that you want converted into written text. Instead of listening and typing everything manually, Transcribe captures the spoken content for you directly in Word.

To polish what you’ve written, Microsoft 365 uses the Editor tool to handle spelling and grammar. It highlights issues as you type and suggests improvements for clarity, making it easier to keep documents and emails professional without extra review time.
5. Use Templates to Save Time
Templates in Microsoft 365 are a simple way to get started without worrying about layout or formatting. Instead of beginning with a blank page, templates give you a ready-made structure that you can adjust as needed.
In Word, Excel, or PowerPoint, go to File > New and browse or search for a template that fits what you’re working on, such as a resume, report, budget, presentation or invoice. The layout, headings, and formatting are already set up, so you can focus on the content right away.
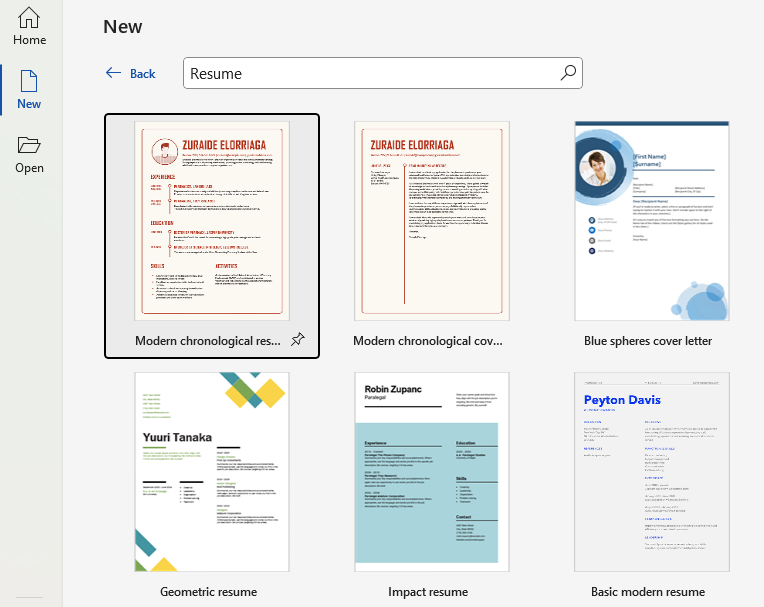
Templates are especially helpful for beginners because they reduce setup time and help keep documents consistent, even if you’re not confident with formatting yet. You can always customize fonts, colors, or sections later as you become more comfortable.
6. Explore Copilot for Writing and Email Help
Microsoft Copilot is built into Windows and Microsoft 365, but not every Copilot feature requires a paid subscription. While advanced actions like full email summarization in Outlook are part of Microsoft 365 Copilot, there are still useful ways beginners can benefit from Copilot for free.
With the free Copilot experience (via the Copilot app or web), you can:
- Ask Copilot to summarize copied email content by pasting it into the prompt.
- Get help rewriting or shortening draft replies before sending them.
- Clarify long messages or meeting notes by asking for a quick explanation.
- Draft responses based on key points you provide.
This works especially well if you select or copy an email, paste it into Copilot, and ask something simple like “Summarize this email” or “Help me write a short reply.” While it’s not automatic inbox summarization, it still saves time and helps you respond more efficiently.
If you want to understand what Copilot can and can’t do in the free version, and how it fits into everyday Microsoft 365 use, take a look at my practical guide: Microsoft Copilot: Your Essential Guide to the Future of Productivity.
7. Organize Email with Focused Search
Keeping up with emails can get overwhelming, especially when important messages are mixed with newsletters, promotions and automated notifications. Focused Inbox helps by separating emails it considers important from less urgent ones.
When Focused Inbox is enabled, your inbox is split into two tabs:
- Focused – messages that likely need your attention
- Other – newsletters and lower-priority emails
Nothing is deleted or hidden. Everything is still there, just organized more clearly.
How to enable Focused Inbox:
- In Classic Outlook: Go to View > Show Focused Inbox.
- In the New Outlook: Open Settings > Mail > Layout, then turn on Focused Inbox.
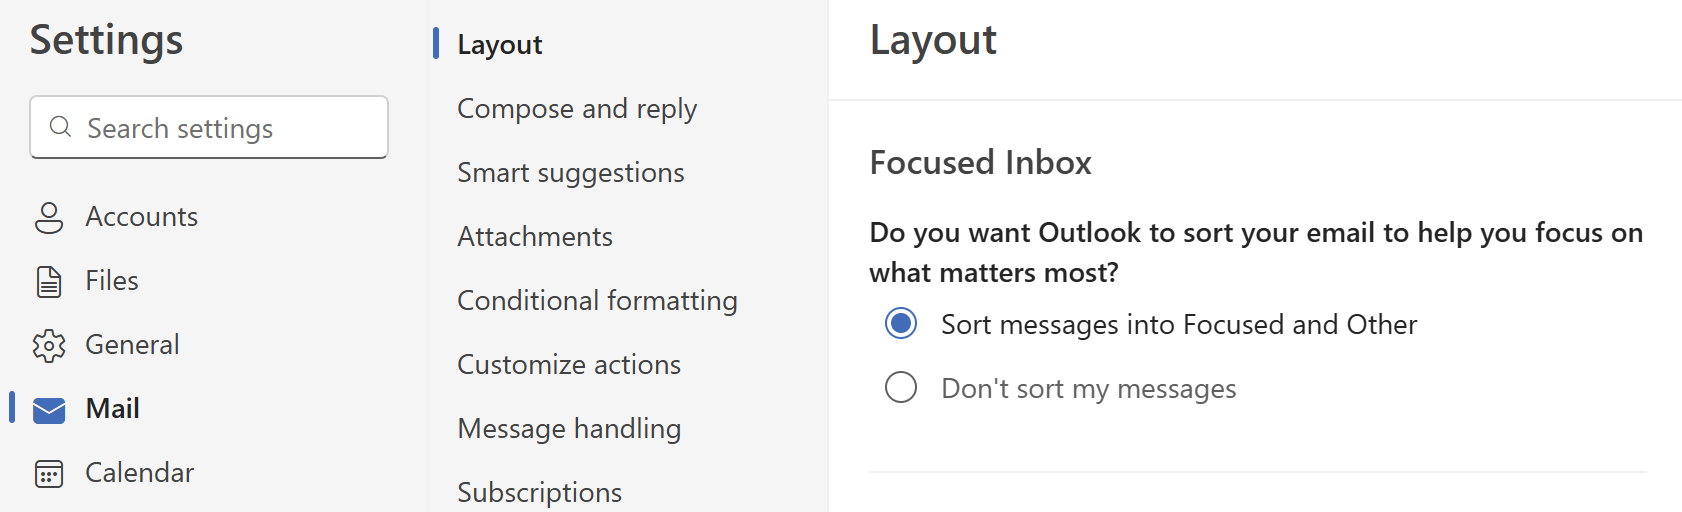
If an email appears in the wrong tab, you can move it manually. Outlook will learn from that action and adjust future sorting automatically.
8. Secure Your Documents with Password Protection
When sharing sensitive documents, adding password protection is a simple way to keep your information private. This is especially useful for files that contain financial details, personal data, or confidential work information.
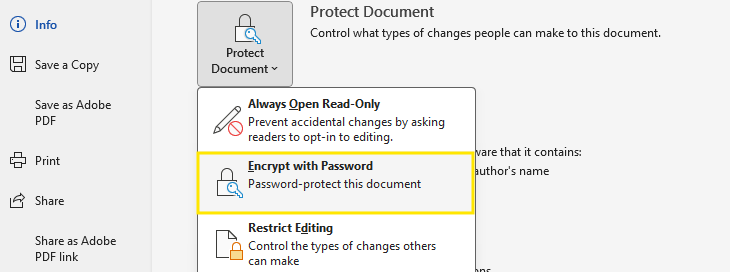
In Word, Excel and PowerPoint, you can protect a file by going to File > Info > Protect Document > Encrypt with Password and setting a password of your choice. Once enabled, anyone opening the file will need that password to access the contents.
This feature works well for documents you plan to send by email or store outside your main workspace. Just make sure to keep the password somewhere safe – Microsoft can’t recover it if it’s lost!
9. Save Your Work Frequently
Saving your work regularly is one of the simplest habits you can build, and it can prevent a lot of frustration. While Microsoft 365 apps include AutoSave for files stored in OneDrive or SharePoint, it’s still important to be mindful of how and where your files are saved.
If you’re working with local files, pressing Ctrl + S often is a good habit to avoid losing progress due to unexpected crashes, power outages or app issues. AutoSave works best with cloud-saved files, but it’s not a replacement for manual saving in every situation.
Microsoft 365 also includes AutoRecover, which can help restore recent changes if an app closes unexpectedly. When you reopen Word, Excel, or PowerPoint after a crash, you’ll usually see recovered versions of your files so you can continue where you left off.
Being aware of how AutoSave and AutoRecover work, and combining them with regular manual saves gives you the best protection against losing important work.
Getting comfortable with Microsoft 365 doesn’t require learning everything at once. Simple habits, like saving files properly, using templates, or keyboard shortcuts, make daily work smoother over time.
These tips are meant to help beginners feel more confident using Word, Excel, Outlook and OneNote in everyday situations, without changing how they already work. Once the basics feel familiar, it becomes easier to notice which tools are useful for your own routine.
Microsoft 365 includes far more features than most people ever need, but starting with the essentials is usually the most effective approach. Once you’re comfortable with the basics, you can gradually explore more advanced tools at your own pace.